Embedding Projects in Your Website
Using the NodeBox JavaScript API, you can embed projects directly inside a <canvas> tag on your page and have full control over the animation and parameter values.
Prerequisites
From your project URL, note the username and project name.
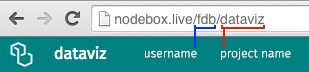
In this example, the username is fdb and the project name is dataviz.
Setup
-
Include the NodeBox API in your page.
<script src="https://nodebox.live/api/v1/ndbx.js"></script>
-
Include a canvas object in your page.
<canvas width="800" height="600" id="mycanvas"></canvas>
Note the canvas id (here
mycanvas). This parameter is used when callingembedin a minute. -
This script includes the `ndbx` namespace in your page. From there, embed your project (replace the arguments in bold with your own username, project name and canvas ID):
var options = {
    userId: 'myusername',
    projectId: 'myproject',
    canvasId: 'mycanvas',
    autoplay: true
};

ndbx.embed(options, function(err, player) {
  // Check for errors, then do something with the player.
});
Note the
autoplayoption: if this is set totrue, NodeBox Live automatically starts playing your animation. -
We'll have to check if there's an error, then create a player:
ndbx.embed(options, function(err, player) {
  if (err) {
    console.log('Load error:', err);
  } else {
    window.player = player; // Make the player object global.
  }
});
The Player Object
The Player object is the main way of controlling your project. It has methods to start/stop/pause the animation and change values.
Changing Node Values
We can change the value of any node while the player is running. We can use this to make our project interactive, for example by taking the input of a form field (e.g. "Your Name") and using that to influence a text node.
Imagine that we have a slider like this:
<input type="range" min="10" max="500" step="1" oninput="changeSize(this)">
To change the value of a node parameter, we use the function player.setValue(nodeName, parameterName, newValue) in the changeSize function:
function changeSize(e) {
    player.setValue('rect1', 'width', 300);
}
Since we've attached the player object to the window, we can access it from anywhere.
Starting / Stopping the Player
Use player.start() to start the player, and player.stop() to stop the player.
While running, NodeBox uses requestAnimationFrame to animate the script in sync with the user's monitor refresh rate.
A Complete Example
Here's a complete example:
<!doctype html>
<head>
    <meta charset="utf-8">
    <title>Embedding Example</title>
</head>
<body>
    <!-- The canvas element, where the visualization is rendered -->
    <canvas id="c" width="700" height="300"></canvas>

    <!-- The slider controls -->
    Size: <input type="range" min="10" max="500" step="1" oninput="changeSize(this)">
    Hue: <input type="range" min="0" max="1" step="0.01" oninput="changeHue(this)">

    <!-- A link to the NodeBox JavaScript API  -->
    <script src="https://nodebox.live/api/v1/ndbx.js"></script>

    <!-- Your custom initialization code -->
    <script>
    // Again, replace these with your own userId / projectId / functionId / canvasId
    var options = {
      userId: 'demo',
      projectId: 'embedding',
      functionId: 'main',
      canvasId: 'c',
      autoplay: true
    };

    // Initialize the NodeBox player object
    ndbx.embed(options, function(err, player) {
      if (err) {
        throw new Error(err);
      } else {
        window.player = player;
      }
    });

    // This function is called when the size slider is dragged.
    function changeSize(e) {
      window.player.setValue('rect1', 'width', e.value);
      window.player.setValue('rect1', 'height', e.value);
    }

    // This function is called when the hue slider is dragged.
    function changeHue(e) {
      window.player.setValue('hslColor1', 'hue', e.value);
    }
    </script>
</body>
</html>